| < Previous page | Next page > |
Variable Ascii
The variable ascii import allows us to import ascii style files.
In the Open Dialog click on the combo box arrow on the "Files of Type" combo box. You will see the "Variable Ascii" option. Click on it and the file dialog box will display the files that have an extension of .csv in the present folder. If you have a file with a different extension, for example ".txt"; change the entry in the "File Name" to *.txt for this example.
Browse to the appropriate directory and click on the appropriate File and click OK. Or double click the file directly and the open/import process is started.
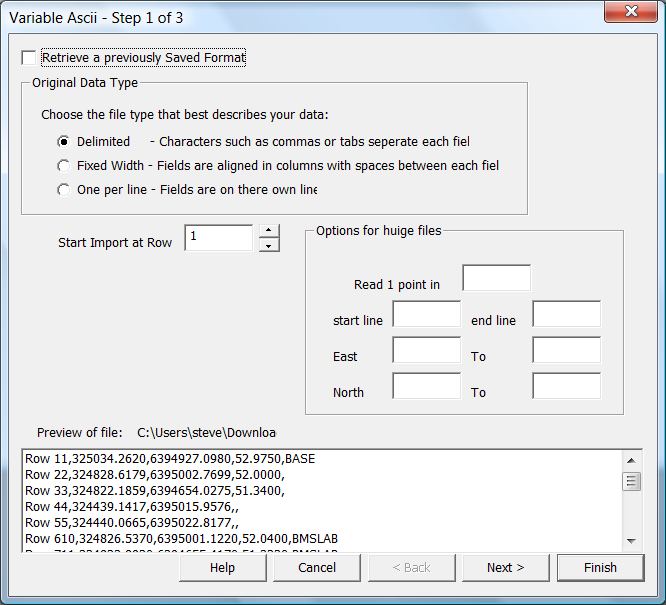
Click OK to any message information box's. We are presented with the first file. Normally you untick the "Retrieve a previously Saved Format", if this is a new format. If you have previously used this option and have saved the format you can tick this option and recall the saved Format to save time.
In this example we have it unticked. You have the option of 3 types of import:
The data is displayed in the preview box. Here we can see the data is delimited by comma's. So here we would have the radio button for delimited set.
If you have some header lines; you can set the "Start Import at Row" value to a value. It defaults to 1 which means there are no headers.
If you have a huge data set such as Lidar we can thin the data a bit. For example if you set the "Read 1 point in" to 5 for example. It means only keep every 5th line. For normal data you would not fill in this option. Alternatively you can read in all the data; and there are some further data thinning algorithms in both Ezigrade and CDS.
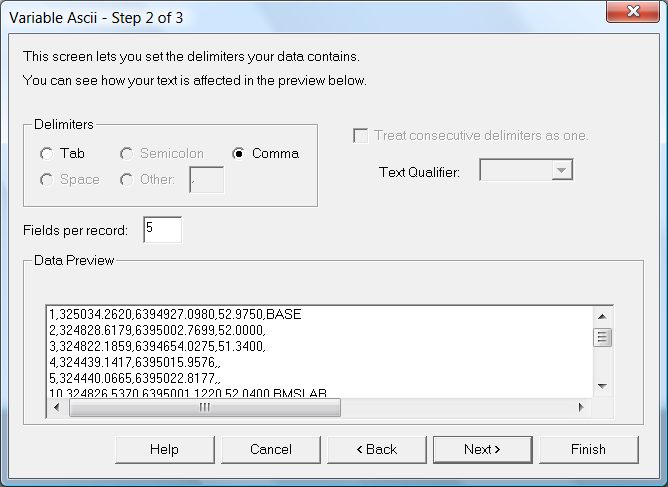
You can now click "Next" and the next dialog is presented. In this case we have 5 parameters so set the "Fields per Record" to 5.
Click Next and we have the next Dialog. We need to set the Field number with what the "Field Data Format" is. Do this for all the fields. If we are importing Lats and Lons make sure you tick the "Import lat/longs" radio button. We only import decimal degrees at present. Contact us if you need this extended. If you tick the "Save Format for Future Use" you save the format file. Next time in you can use the saved format.
I
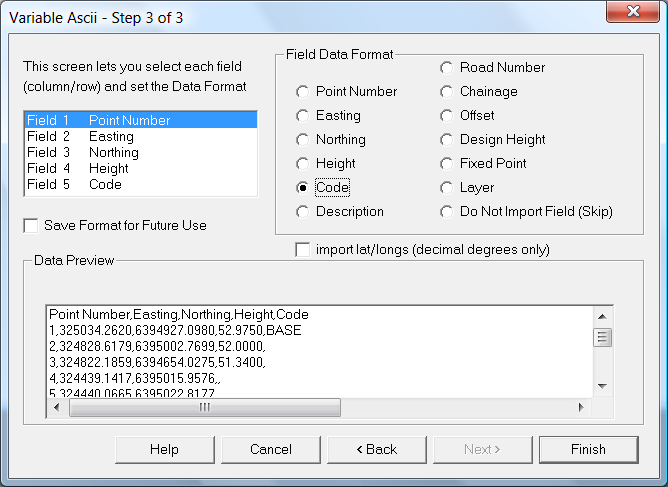
Now click on "Finish" and the points are imported into the cdsdat file.
If you have a file such as job1.csv the file "job1.cdsdat" is created and it contains the appropriate data.
|